I've never
posted step by steps of my dye day because I've got my wet gloved hands and don't feel like dealing with the camera.
Today while dyeing 10 pounds of merino/tencel roving I decided to stop and take a few pix.
This is a long post on dyeing so if you're not interested stop here or go to the end to see Bailey, my dye companion.
One question I get asked quite often is "Why don't you dye more saturated bright colors?". Why? Well, they're not the colors I like as much. They are very fun to spin but then I find I have no clue what to use the resulting handspun for other than crazy sox. So I dye more muted colorways, many times in varying shades of one or two colors that will hopefully result in beautiful knitted, crocheted or handwoven items. I do dye colorways that don't appeal to me to spin but I try to have a bit of something for everyone. Last year I got away from dyeing exact color separations because I personally am tired of spinning yarns that create definite stripes or barberpoles. I love the results of my current dyeing where I get more complex looking handspun yarn but no worries about color pooling or striping. If someone wants those bright colors there are plenty of other indie dyers out there that create beautiful colorways.....and they are beautiful.
My dye day actually starts with getting everything out - tables were already set up from yesterday, 2 burner propane stove set up, all squeeze bottles, measuring devices, buckets out from yesterday too so this morning all I had to do was pull the dye stocks out of the garage along with the papertowels and surgical gloves (Costco has a great price on these in boxes of many). I like having all my dye stock already made and ready to go - I make them up in 2 1/2 gallon containers at the end of the dye day so they're ready to go the next time. I make up red, blue, yellow, cyan, pink and then so I don't have to make brown I have a gold ochre and brown, and also black.

I fill up 2 buckets with a bit of synthrapol, some glugs of vinegar (yes, that is a technical term - glugs) and water. I already have my roving weighed out into approximately 8oz lengths - I put 2 8oz lengths in each bucket to soak for around 20 minutes. I buy my vinegar in large quantity at either Costco or Cash & Carry, a restaurant supply store - same prices, within blocks of each other. As soon as this roving moves to the table to be dyed, more roving goes in the buckets - it's a carefully orchestrated schedule I work on. I had to do this since I used to dye anywhere from 15-20 pounds in a day, now my limit is 10 pounds in a day, just too hard on the body anymore.
While it's soaking I work like a mad scientist mixing up my colors for that roving. My dyes are Jacquard that I buy in the monster containers since I go through a lot of dye - much more economical that way.
Then I layout 24" wide plastic wrap on both sides of the table with enough overhang on the ends to pull up over the roving after painted. This can be a pain to do if the wind is up - downright aggravating. Here I've got a total of 2 pounds of roving laying out ready to paint. See the edge of the table leg? I've got my tables sitting on bed risers to add height to them so I'm not bending over as much. I've also got cushioned floor pads on each side of the table and in front of the dye table - it's the gray 'thing' on the concrete.
Here it is after painting. I use the squirt bottles to apply the dye and my fingers to make sure it's all worked in to dye all the fibers. Then I cover this up with the plastic, roll it up and put it in 2 gallon bags to steam. A pound of roving will not fit in a 1 gallon ziplock bag - Albertson's has been my store of choice for the 2 gallon bags for years (actually they're my only store that carries them), now all of a sudden they're not selling them - argh! I had one box left. My cousin called and told me the dollar store had 2 1/2 gallon bags so I ran over there a couple weeks ago and bought lots and lots of them.....thinking I should go back and clean out the store shelf if I have time.

Here are two bags in one of the steamers. I have two of these pots going on the propane burners all day. Occasionally I have a turkey roaster (no, not with turkey, with roving in it) going on a side table too. They're big canning pots with the canning jar racks in the bottom covered by metal vegetable steamers to keep the bags out of the water. I steam them for around 45 minutes, give or take.
Here's what the roving looks like after it comes out of the steamer. I lay it out on the concrete, open up the plastic wrap, carefully because it is hot, and let it cool down before putting them in buckets to rinse. I thought about taking pictures of the roving in the buckets but then forgot - mind wanders while I'm out there listening to 60's music on Sirius radio.
Important little tube of ReDuran used at the end of the day to get dye off my skin, not sure what's in it but it's a pumice type of 'stuff'. I do wear gloves but occasionally get a splash of dye up on my arms but mostly the dye ends up on my feet - I'm a sloppy dyer. This works great at getting the majority of the dye off so I can go out in public tomorrow.
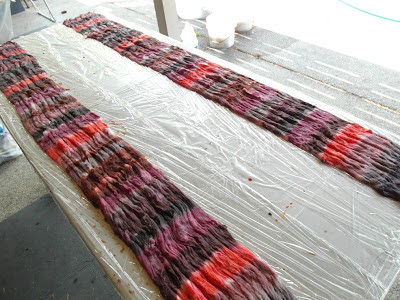
Here's what I dyed today. Yes, that's a yellow in there. When I first started dyeing yellow I thought no one would buy it but I love yellow and wear it often so figured I'd spin it myself. I still haven't spun any because it all sells. Maybe this time I'll get some spun for myself. After the roving is all dry I weigh it, photograph it for my
etsy shop, braid or bag it and spin a small sample. I've been braiding most of the roving (not the merino/bamboo or merino/tencel as those are thinner rovings) - braiding makes for pretty pictures, it also makes for easy storage but I really don't like how it compacts the roving.....not a big deal, just open it up a bit and it spins beautifully, but I'm considering going to bagging it all this year.
Bailey, Bailey, we're finished with dyeing today - you can wake up now. His favorite spot laying under the maple and smooshing down my blue vinca and hostas.
Uh-oh, the wind just picked up and I heard a drying rack fall over - not a good thing as my drying racks are already being held together by duct tape and tie-wraps from constantly being blown over. Guess I better get down there and pick it all up..........


It looks very involved but very fun. The yarns look great!
ReplyDeleteThis was really interesting, Cindie. Thanks for giving us a "behind-the-scenes" look at what it takes to create your beautiful rovings!
ReplyDeleteHugs,
Boom
Thanks, Cindie, for sharing one of your dye-days with us. Very interesting!
ReplyDeletewonderful post! one day i will be brave enough to give dying a shot :) in the mean time i will continue to grab up some of yours :) im eyeing the yellow i love anything in that cheerful color :)
ReplyDeleteHeather you should definitely give the dyeing a shot - it's very fun, sometimes not as fun when mass producing like I do but I just turn up the music and enjoy my day........my back doesn't necessarily enjoy it or the day after but......... You don't need a big set-up just to dye for yourself, a pot to steam in that will only be used for dyeing (think garage sales), some sort of burner, plastic wrap, a bucket or two, some dye and vinegar.
DeleteFascinating! I can see it's very physically demanding. I wonder if you should put a version of this article on your Etsy shop (on the About page) so customers can learn more about the process?
ReplyDeleteHmm, will have to check that out, not sure how much can go on that About page........the back is still hurting from 2 long days of dyeing, not sure how long I can keep it up.
Delete